

How to Integrate an Identity Verification API
Learn the secure architecture for identity verification, then implement server-side sessions, a hosted flow, and signed webhooks with Stile’s API.
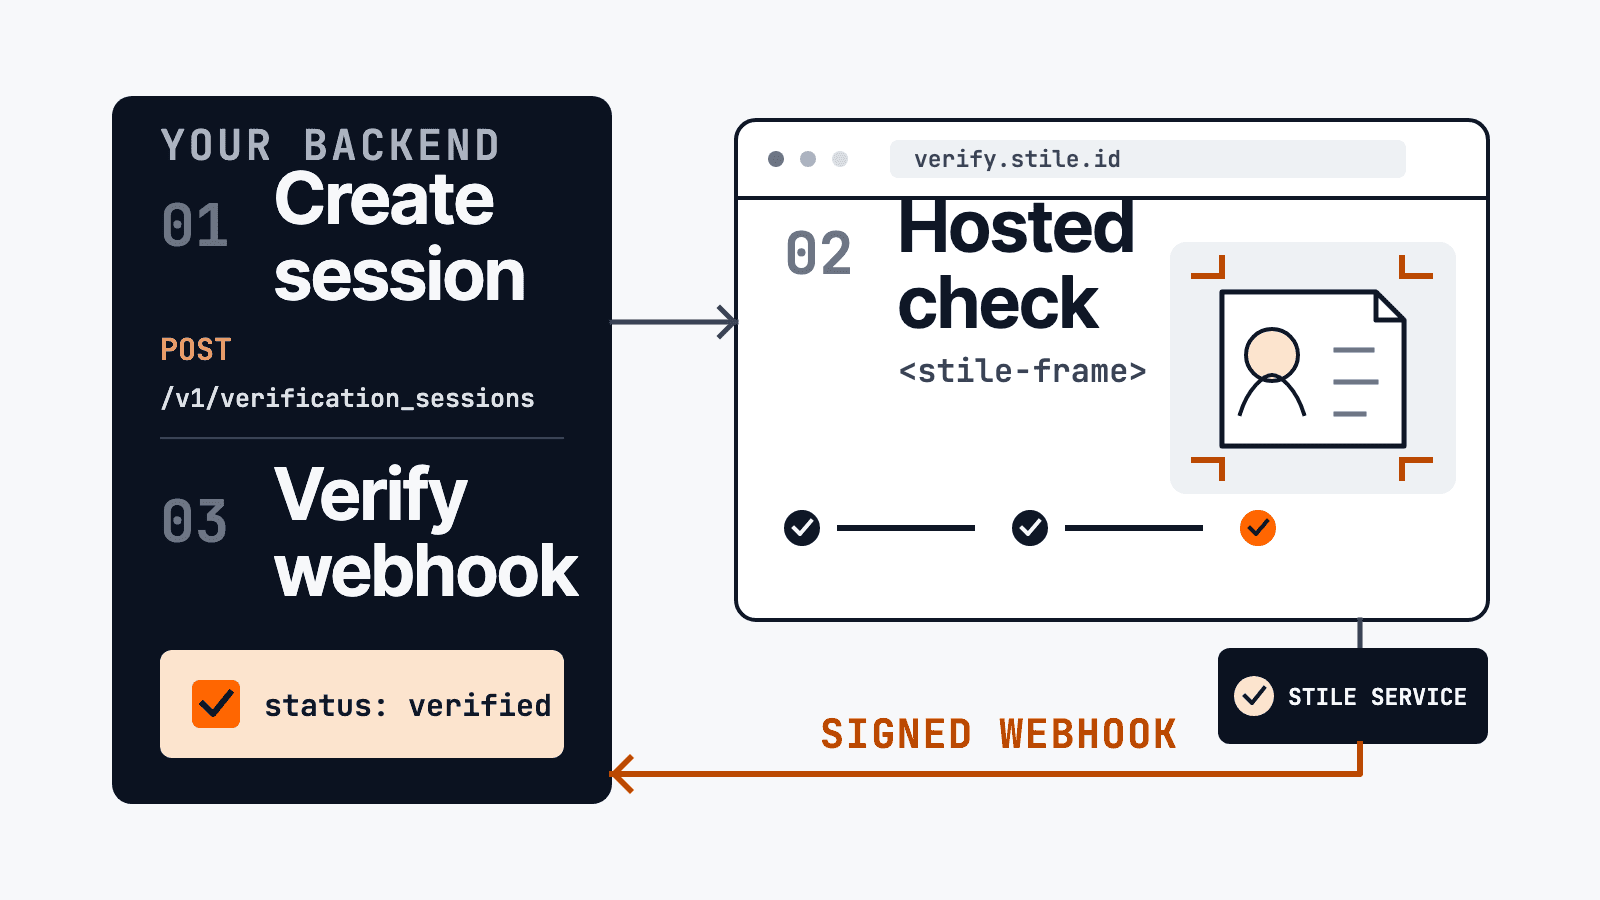
To integrate identity verification into an app, create each verification session on your server, send the user through a hosted verification flow, and update trusted application state only after your backend verifies a signed result. A browser completion message is interface feedback, not authorization.
That architecture is portable across providers. This guide explains the pattern and the capabilities to evaluate, then implements it with Stile’s HTTP API, hosted <stile-frame>, and signed webhooks.
The production identity verification pattern
A production integration separates the user experience from the server-side trust decision. It has six responsibilities:
Define the verification policy for the action and jurisdictions you support.
Create a session on an authenticated backend and bind it to the correct user or transaction.
Give the browser only short-lived credentials for a hosted or isolated verification experience.
Receive the result over a signed server-to-server channel.
Match the provider session to your local record and apply the result idempotently.
Test success, rejection, replay, mismatch, timeout, and retry paths before launch.
Keep the trust decision on the server
The browser can show progress and completion, but it should not grant access, release an order, approve an account, or mark a local record verified.
What to look for in an identity verification API
Choose an API that makes the trust boundary explicit and gives your backend enough information to apply its own policy safely. Look for:
server-side session creation with stable idempotency controls;
a hosted or isolated capture flow that keeps secret keys and raw identity evidence out of browser code;
configurable policies for proof methods, jurisdictions, liveness, face match, and review;
signed webhooks with stable event, session, and client-reference identifiers;
a sandbox that can exercise real webhook, replay, mismatch, and failure behavior; and
clear documentation for retention, deletion, audit fields, and returning-user behavior.
The proof methods themselves should match your use case and jurisdictions. Document capture, mobile identity documents, liveness, and face match are capabilities; your application still owns the decision that follows the verified result.
Worked example: integrate identity verification with Stile
The rest of this guide maps that architecture to Stile. The implementation uses:
a workflow to define the verification policy;
the Verification Sessions API to create a server-side session;
the hosted widget to run the user-facing flow; and
a signed webhook to deliver the backend result.
For copy-paste examples in multiple backend languages, keep the Stile Quickstart open beside this article. The docs are the source of truth for endpoint and field details.
Before you start
You need:
- a Stile account;
- a secret API key beginning with
stile_sk_; - a published Stile workflow with an ID beginning with
wf_; - an authenticated backend endpoint in your application; and
- a public HTTPS endpoint for Stile webhooks.
You do not need OAuth credentials, a client ID and secret pair, or a provider-specific server library. Stile authenticates server requests with a Bearer API key, and the public HTTP API works with any backend language.
How Stile maps to the pattern
A production Stile integration separates three trusted boundaries.
Your browser
The browser renders the hosted <stile-frame> component. The widget handles the user-facing verification flow without sending your secret API key to the client.
Your server
Your server authenticates the user, selects a published workflow, creates the Stile session, and stores the returned session ID against the user, order, account change, delivery, or other action being verified.
Your webhook handler
Stile sends a signed event when the session changes state. Your webhook handler verifies the signature, matches the Stile session to your local record, and applies the result once.
That last step is the source of truth. A browser redirect or stile:verified event is useful for interface feedback, but it is not proof that your backend should trust.
Step 1: Publish a verification workflow
A Stile workflow defines the policy for every session that uses it. Configure:
- the use case;
- target jurisdictions;
- accepted verification methods;
- liveness and face-match requirements;
- returning-user preferences; and
- session expiry or review behavior.
For an identity verification flow, the workflow might offer a mobile driver's license when supported, with physical document capture as another path. Selfie liveness and face match are layers that run alongside a primary proof method rather than methods on their own.
Copy the published workflow ID from the Stile dashboard. Add it and your secret key to the server environment:
Keep all three values out of client-side code. Do not prefix them with NEXT_PUBLIC_ or place them in a browser bundle.
Verification policy lives in the workflow, not the request
workflow_idis required on every session you create, and amethodsarray cannot be combined with it. The published workflow controls which methods run, and Stile resolves them for the applicable use case and jurisdiction.
Step 2: Create a verification session on your server
Create an authenticated endpoint such as POST /api/identity-verification/start. The endpoint should load the current user and the local action being verified from your database, then call Stile.
Send only the identifiers the workflow needs
Include
client_reference_idis the server-owned value that binds the Stile session to the user or transaction in your system.
A few details are important:
type: "identity"creates an identity verification session. Usetype: "age"for an age verification flow, ortype: "student"for a student check.workflow_idis required, and it selects the policy you published in Stile.client_reference_idshould identify the user or transaction in your system. Stile echoes it in webhook events.Idempotency-Keymakes a retry return the original session instead of creating a duplicate. The replay carries anIdempotency-Replayed: trueresponse header, and reusing the same key with a different body is rejected with a 400 rather than silently resolved.client_secretis short-lived and intended for the widget. Return it to the browser, but never log it.- Persist
session.idbefore the user completes verification.
Derive identity and ownership from your authenticated server session. Do not accept an arbitrary email, user ID, workflow ID, or transaction ID from the browser without validating it.
Live sessions require a webhook endpoint first
Outside sandbox, Stile refuses to create a session for an organization with no enabled webhook endpoint: the call fails with a 400 and a
webhook_requirederror code. Register the endpoint in Step 4 before you switch a live key on.
Step 3: Add the hosted Stile widget
Load Stile's public widget script and point the component at the backend endpoint you created:
The widget sends a POST to session-url with a small JSON body of hints (workflowId, email, jurisdiction), and expects JSON back containing session_id and client_secret. Note the shape difference: the Stile API returns the session as id, and your endpoint remaps it to session_id. Returning methods and age_tier as well lets the widget render the real step rail instead of falling back to a wallet-only one. Your server authenticates the request, creates the session, and returns only those short-lived fields.
The hosted experience can guide the user through the methods compiled from the workflow. Depending on the workflow and jurisdiction, that can include:
- an ISO/IEC 18013-5 mobile driver's license from a supported wallet;
- physical identity-document capture; and
- selfie liveness and biometric face match layered on top of the primary method.
No app download is required for the hosted browser flow.
You may listen for the widget's stile:verified event to show a completion state. Do not use that client-side event to mark the user verified. Its own payload says so: the event detail ships with serverConfirmed: false. Show a confirming state while your frontend waits for your own backend to process the signed webhook.
Step 4: Verify Stile's signed webhook
Add an HTTPS endpoint in the Stile dashboard and subscribe to verification_session.verified. Save the one-time signing secret as STILE_WEBHOOK_SECRET.
Stile sends the signature in this format:
There is no X- prefix on that header name. The v1 value is a lowercase hexadecimal HMAC-SHA256 signature over:
The request body must remain raw until after signature verification. With Express, register this route before express.json():
The event envelope is { id, object: "event", type, created, data: { object } }, where data.object is the verification session.
Your application-specific markVerificationCompleteOnce operation should use one database transaction to:
- claim
event.idunder a unique constraint; - find a pending local record whose Stile session ID matches
session.id; - confirm its local ID matches
session.client_reference_id; and - transition that record to verified exactly once.
Return 2xx after the event is safely persisted or queued. Return 400 for an invalid signature. Return 5xx for a temporary processing failure so Stile can retry: delivery is attempted up to five times with an escalating backoff, and a 4xx other than 429 is treated as permanent and not retried.
A valid signature proves Stile sent the event. Matching the session ID and client_reference_id proves the result belongs to the action your application is about to approve.
Step 5: Test the full flow in sandbox
Use a dedicated Stile sandbox organization for development and automated tests. The API base URL and key format stay the same.
In sandbox only, add skip_verification: true to create a session that moves directly to verified and fires a real signed webhook:
Use an HTTPS tunnel such as ngrok or Cloudflare Tunnel to expose a local webhook handler. Then test:
- valid and invalid signatures;
- duplicate webhook delivery;
- a mismatched session ID or
client_reference_id; - retries with the same idempotency key;
- unauthenticated session-creation requests; and
- a browser completion event arriving before the webhook.
Remove skip_verification before using a live organization. Live sessions reject it with a 400.
What your application receives
Stile returns a signed verification outcome, not an authorization decision. The event includes the session status, completed method, resolved jurisdiction, age tier when applicable, and audit fields. Your server binds that outcome to the stored session and client_reference_id, then applies its own access, fulfillment, or review policy.
In the public integration, identity-document images do not enter your application. Captured document evidence is purged after a final verification or review decision. Session-collected PII follows the resolved retention policy; verification outcomes and sensitive one-way hashed anchors can persist for audit, deduplication, and returning-user checks. Review the retention details for lifecycle specifics.
Proof with less data
Your application receives the result it needs to evaluate the action without becoming another store of document images, selfies, or raw document data.
Production checklist
Treat production readiness as three launch gates. Every gate must pass before your policy trusts a verification outcome.
1. Session setup
Publish the workflow in the intended Stile organization.
Protect the session endpoint with authentication, ownership checks, and rate limiting.
Keep API keys and workflow selection on the server, and use a stable
idempotency keyfor session creation.Store the returned Stile session ID against the matching local transaction.
2. Browser handoff
Pass only the short-lived session fields the hosted widget needs.
Use the browser’s
stile:verifiedevent for interface feedback only, never to update trusted state.
3. Webhook gate
Register and enable a live HTTPS webhook endpoint before creating live sessions.
Verify
Stile-Signatureagainst the raw request body before applying the event.Deduplicate by
event.id, then match both the Stile session ID andclient_reference_idto the pending record.Let access or fulfillment depend only on webhook-backed server state.
Run the complete loop in sandbox
Create an account, publish a workflow, and send a sandbox request with skip_verification: true. Confirm that your webhook handler authenticates the event and updates only the matching pending record. Remove skip_verification before switching to a live organization.
Start free · Open the production quickstart · Review the Verification Sessions API
Frequently asked questions
How do you integrate identity verification into an app?
Create sessions on an authenticated server, run the user through a hosted or isolated verification flow, and update trusted application state only after verifying a signed server-to-server result. In the Stile example, those pieces are the Verification Sessions API, <stile-frame>, and a signed webhook.
Do I need a Stile server SDK?
No. Stile’s public API uses standard HTTPS and Bearer authentication, so any backend language can create sessions. The hosted <stile-frame> component handles the browser experience.
Can my application trust the browser’s stile:verified event?
No. Use that event only to update the interface. Grant access, release an order, or mark a local record verified only after your server authenticates the signed webhook and matches both the Stile session ID and client_reference_id.
How can I test the flow without a real identity document?
In a sandbox organization, create a session with skip_verification: true. The session moves to verified and sends a real signed webhook. Live organizations reject this field.
Does my application receive ID images or selfies?
Not through the public integration. Your application receives the verification outcome and relevant result fields. Captured document evidence remains inside Stile until the verification or review reaches a final decision; verification outcomes and sensitive hashed anchors can persist for audit and returning-user use cases.
Share this article